


Watch the video for an overview of operating your X-1 and follow the guide below for step-by-step general instruction.
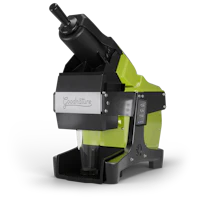
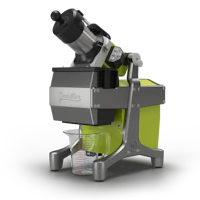
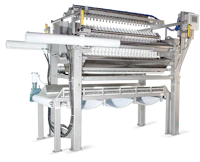
The X-1 is a professional juicer capable of producing a thousand bottles of juice per day.
Grinder Operation
- Hang the press bag in the ‘Grind’ position by hanging the front of the bag from the two grinder stems on the grinder housing. This will reduce splatter during grinding.
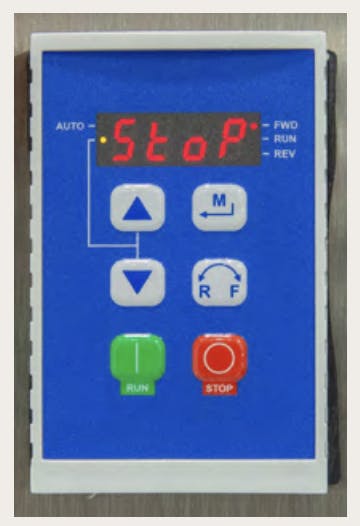
- Plug in the machine. To power on grinder, ensure that the red emergency stop button is pulled out, and press the green ‘Run’ button on the Keypad. The grinder will return to the speed to which it was set the last time it was run.
- The grinder should be freely turning in a counterclockwise direction with no interference or rubbing. If it is not, shut the grinder off and contact Goodnature customer service.
- To change speed of grinder, use the up and down arrows on the keypad.
NOTE: The speed of the grinder is displayed in frequency (Hz) and not in rotations per minute (RPM). 30Hz ≈ 1725 RPM; 60Hz ≈ 3450 RPM. IMPORTANT: Run grinder at a minimum speed of 30Hz. - Once grinder is up to desired speed, drop produce in end of hopper chute. Do not fill hopper chute more than 1/3 full, as this may cause grinder to slow down or stop. Use the produce feeder to gently push the produce down the chute. Never use excessive force or overload the motor. Push produce feeder until it contacts the shredder plate knob.
- Continue grinding produce until the bag is about 50-75% full. This will allow the slurry to move around during pressing and not come up and out of the bag.
- When grinding is complete, power off grinder by pressing the red ‘Stop’ button on the keypad.
- After the grinder has come to a complete stop (keypad will display STOP), change the bag from ‘Grind’ position to ‘Press’ position by removing the front of the bag from the grinder stems and hanging it from the platen stems on the stationary platen.
NOTE: When grinding is complete, there may be some produce collected behind and around the grinder disc, as well as in the base of the hopper chute. This is normal and does not mean your machine is operating outside of specifications.
Changing Grinder Disc
- Remove the hopper by unscrewing the 4 hopper knobs.
- Remove the shredder plate knob from the center of the grinder disc assembly.
- Loosen but do not remove all eight retaining screws around the perimeter of the grinder disc.
- Rotate the grinder disc slightly counterclockwise to free it from the retaining screws.
- Attach desired grinder disc, making sure the sharp side of the disc is pointing up.
- Rotate the grinder disc slightly clockwise so that the retaining screws move into the slots on the disc.
- Tighten all screws. Do not over tighten. This may strip the threads on the grinder disc backing plate.
- Replace and tighten the shredder plate knob.
- Replace the hopper.
Press Operation
- Hang the press bag in the ‘Press’ position by hanging the bag from the four platen stems.
- Check to make sure the directional lever is in the neutral position.
- Ensure press is plugged in, then power on hydraulic power unit by turning the on/off switch, mounted on the side of the press, to the side of the press.
- To move the platen forward for pressing, move the directional valve to the forward position by turning it one click towards the front of the machine.
- The speed of the press can be controlled with the red flow control valve.
NOTE: Juice will begin to rush out of the bag and into the juice tray. If the produce in the press bag starts to move up in the bag or out of the top of the bag, slow the press down or put it in neutral to give it a chance to drain. The most effective method to pressing is a slow and gradual increase in pressure. Rushing the press cycle can negatively effect yield and cause the press bag to burst. - To retract the platens after pressing, move the directional lever toward the rear of the machine one click into neutral then one more click into reverse.
- Once the platen is fully retracted, return the directional valve to the neutral position.
Adjusting Press Speed
If press is too slow: this will not have a negative effect on the juice or the machine but will decrease the amount of produce per hour the machine can handle.
If press is too fast: this generally causes undesired outcomes.
- The produce can slide up and out of the press bag.
- The pressure inside the bag can climb too fast, possibly causing the bag to rupture or forcing produce to extrude through the bag.
- Juice will squirt up and out of the press.
- You will experience lower yields from your produce because there was not a slow gradual increase in pressure.
To Set The Press Speed:
- Turn the flow control valve all the way clockwise until it stops.
- With the directional lever in neutral position, turn the hydraulic power unit on.
- Move the directional lever into forward position. The platen may move but at a very slow speed. To stop motion completely, use the directional lever.
- Turn the flow control valve slightly counterclockwise. You may want to put the press into the neutral position to make turning the flow control valve easier. The platen should increase in speed.
NOTE: The knob needs to be turned only one full rotation to adjust the speed from stopped to full speed. A full-speed pressing would take about 45 seconds. This is too fast for most applications with the exception of some greens or materials that drain very easily. An average speed that works well with most material is one where the platen takes about two minutes to close.
Adjusting Hydraulic Pressure
The hydraulic pressure is set to 1800 PSI during manufacturing. This is appropriate for most produce; however, for some produce, a lower pressure is ideal. Pressure will only build to the set point once the unit is fully closed and press movement has stopped.
To change the hydraulic pressure in the hydraulic pump:
- Put the directional lever in neutral position and turn the hydraulic power unit on.
- Turn the directional lever to forward position and allow it to press fully closed.
- Once the cylinders are fully extended, the pressure gauge should start to display an increase in hydraulic pressure.
- Remove the first locking nut and then loosen the second lock nut on the adjusting screw located on the front of the hydraulic pump.
- Using an Allen wrench, turn the screw counterclockwise to lower the pressure, or clockwise to raise the pressure.
- Put press in neutral for 15 seconds, then close press and allow pressure to stabilize again. Continue to follow steps 5 and 6 until pressure is to desired setting.
- When the desired pressure is achieved, re-tighten the locknuts.
Other Videos
You can find other instructional videos on our youtube channel.
For more detailed information on operating your X-1, refer to the X-1 Owner's Manual. For product and ordering information, visit the X-1 product page. To order new parts and press bags, visit the X-1 parts page.