Watch the video for an overview of general cleaning and follow the guide below for step-by-step general cleaning and deep cleaning processes.
Disassembly and Cleaning the Parts
- Turn the power switch to the OFF position.
- Remove the ReadyGrind® Kit by twisting counterclockwise and lifting up and off.
- Simply rinse out or if finished juicing, disassemble and wash.
- Remove Press Kit, lift up and out.
- Simply rinse out or if finished juicing, disassemble and wash.
- Remove the Drip Tray and wash.
- Wipe down the machine with a wet cloth then wipe dry. Sanitize machine and all parts according to your local health department’s regulations. Do not spray machine.
NOTICE: Cleaning with a high power jet may cause damage to the machine.
Follow manufacturer’s instructions for use of chemicals for cleaning and sanitizing food contact surfaces and verify that they are approved by your local health authority.
Wash, rinse, and sanitize all food contact surfaces of cold press juicer:
- After each use.
- Any time contamination occurs or is suspected.
- At a minimum of once every four hours while the machine is in use.
Wash, rinse, and sanitize food contact surfaces in adherence to local health regulations. We recommend the following procedure:
- Wash surface with detergent solution.
- Rinse surface with clean water.
- Sanitize surface using a sanitizing solution mixed at a concentration specified on the manufacturer’s label.
- Place wet items in a manner to allow air drying.
To Deep Clean
Depending on your cleaning procedures and produce build up over time, you might need to detail the equipment to remove build-up.
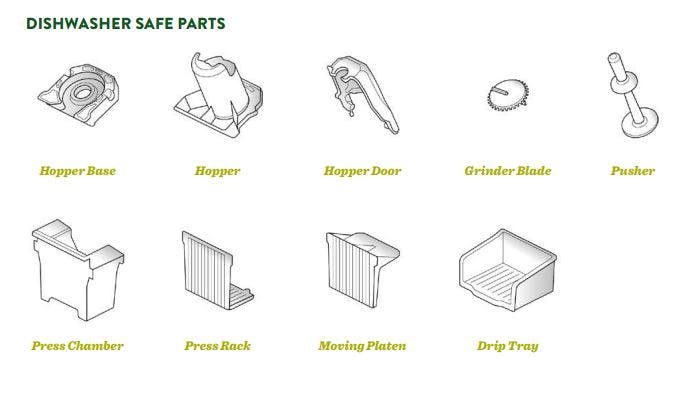
- For all the removable parts, (Hopper, Hopper Base, Hopper Door, Grinder Blade, Pusher, Press Chamber, Press Rack, Moving Platen and Drip Tray), we recommend soaking in a solution of 3 oz of Lime-B-Gone per gallon of hot water (manufacturer’s recommendation for utensil cleaning) for a maximum of one hour.
- Rinse and scrub with a cleaning brush to remove any remaining residue.
For product and ordering information, visit the M-1 product page here. To order new parts and press bags, visit the M-1 parts page here.

Join Our Mailing List
Get juice business insights and educational materials sent directly to your inbox.
X-1 Mini Cleaning Guide and Video
Cleaning the X-1 Mini Pro can be done in-place without complicated processes or special tools. Simply rinse between recipes if needed, or do a deep cleaning by removing the parts by hand and cleaning like any other kitchen equipment—wash, rinse, sanitize. Watch the video for an overview of general cleaning and follow the guide below for step-by-step general cleaning and deep cleaning processes.
DISASSEMBLY AND CLEANING THE PARTS
- With the machine “ON” and all components still assembled, press the SINGLE button and allow the press rod to extend. Once extended, lift the grinder to the “Up” position to stop the press. Clean the press rod with a wet cloth then wipe dry. Press the STOP button to retract the press rod.
- Press the power switch to the “OFF” position, disassemble the grinder and place parts aside. For detailed disassembly instructions, follow the steps in the “Assembly” section of the manual in reverse.
- We recommend rinsing the grinder in the “Down” position while the press chamber and an empty juice container are in-place. The dirty water will collect in the juice container. Doing this step now will make cleaning the machine easier.
- Remove the press chamber with moving platen and juice container.
- Take all parts to sink for washing and follow local health regulations for cleaning. This usually involves washing, rinsing, and sanitizing.
WIPEDOWN
- Leave pitcher in place until grinder base is wiped clean, this will minimize mess.
- Wipe any remaining produce out of the grinder base.
- Lower the shredder base to the “Down” position. Rinse the shredder base with water, it should collect in the pitcher. Remove pitcher and wipe down the machine.
NOTICE: Cleaning with a high power jet may cause damage to the machine.
Follow manufacturer’s instructions for use of chemicals for cleaning and sanitizing food contact surfaces and verify that they are approved by your local health authority.
Wash, rinse, and sanitize all food contact surfaces of cold press juicer:
- After each use.
- Any time contamination occurs or is suspected.
- At a minimum of once every four hours while the machine is in use.
Wash, rinse, and sanitize food contact surfaces in adherence to local health regulations. We recommend the following procedure:
- Wash surface with detergent solution.
- Rinse surface with clean water.
- Sanitize surface using a sanitizing solution mixed at a concentration specified on the manufacturer’s label.
- Place wet items in a manner to allow air drying.
To Deep Clean
Depending on your cleaning procedures and produce build up over time, you might need to detail the equipment to remove build-up.
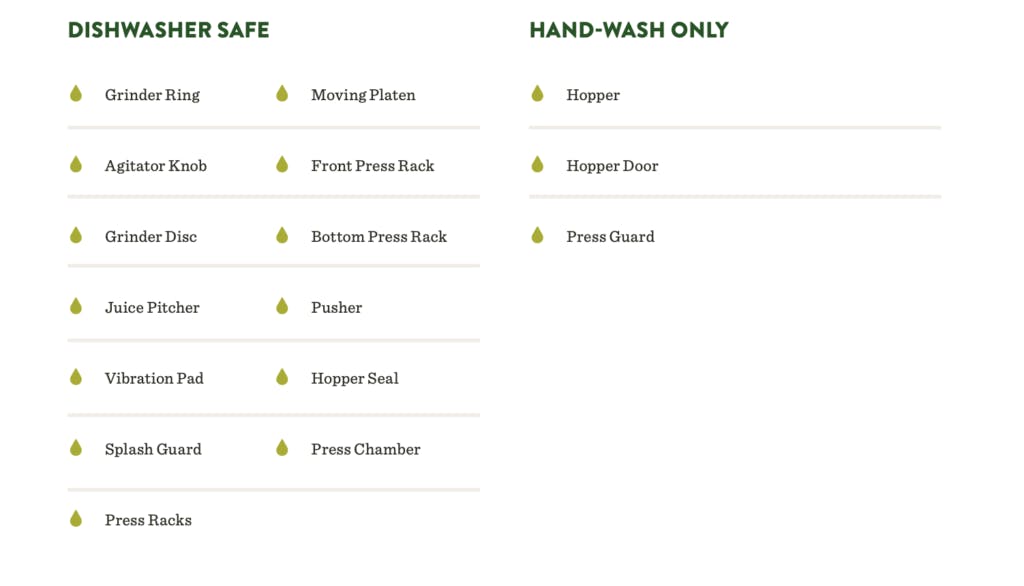
- We recommend soaking removable parts (all except the hopper) in a solution of 3 oz of Lime-B-Gone per gallon of hot water (manufacturer’s recommendation for utensil cleaning) for a maximum of one hour.
- Rinse and scrub with a cleaning brush to remove any remaining residue.
Learn more about the X-1 Mini Pro here. To order new parts and press bags, visit the X-1 Mini parts page here.
X-1 Cleaning Guide and Video
Learn how to properly clean your Goodnature X-1 Commercial Cold Press Juicer and the EG260 Grinder
Other Videos
You can find other instructional videos on our youtube channel at youtube.com/goodnaturepro
Washing and Sanitizing Press Bags
Applies to Goodnature juice presses that use reusable cloth press bags.
PURPOSE: To prevent foodborne illness by ensuring that all food contact surfaces are properly cleaned and sanitized.
Warning: Always follow regulations stated by Local Health Services.
When to wash, rinse, and sanitize press bags:
- After each use
- Any time contamination occurs or is suspected
- Every four (4) hours of constant use for all food contact surfaces
Wash, rinse, and sanitize press bags using the following procedure:
- Wash bag with water and brush to remove all surface food particles
- Wash surface with detergent solution
- Rinse surface with clean water
- Sanitize surface using a sanitizing solution mixed at a concentration specified on the manufacturer’s label.
- Keep bags soaking in Sanitizing solution overnight to assist with keeping bags white.
- Place wet items in a manner to allow air drying before use. We do not recommend machine drying as this can result in shrinking and will lessen the lifespan of the press bags.
Pro Tip: If not using that often, store dry bags in a sealed container to avoid exposure to dust or build up. Then do a quick wash before use. Do not store damp bags in a sealed container – it will make it easier for bacteria to grow.
If a 3-compartment sink is used, setup and use the sink in the following manner:
- In the first compartment, wash with a clean detergent solution at or above 110° F or at the temperature specified by the detergent manufacturer.
- In the second compartment, rinse with clean water.
- In the third compartment, sanitize with a sanitizing solution mixed at a concentration and contact time specified on the manufacturer’s label or by immersing in hot water at or above 171° F for 30 seconds.
- Test the chemical sanitizer concentration by using an appropriate test kit.
If a dish machine is used:
- Check with the dish machine manufacturer to verify that the information on the data plate is correct.
- Refer to the information on the data plate for determining wash, rinse, and sanitizing (final) rinse temperatures; sanitizing solution concentrations; and water pressures, if applicable.
- Follow manufacturer’s instructions for use.
Ensure that food contact surfaces reach a surface temperature of 160° F or above if using hot water to sanitize.