This procedure will guide you through the steps to remove the top grinder panel on the Goodnature X-1 Mini.
It is best to have a clean and dry unit while making repairs. Before you begin, make sure you have a dedicated clean and cleared surface to use for a workspace.
Warning: Performing this service without the guidance and pre-approval of Goodnature will void the warranty. Please contact us prior to service.
Tools Required
- Medium Sized Phillips (+) Screwdriver
Machine Preparation
1. Power unit off and unplug unit
2. Remove the hopper door
3. Remove the hopper
4. Remove grinder disc and grinder ring
5. Place the press chamber in the press and attach the press guard
6. Lower the grinder to the DOWN position
Removing Grinder Top Cover
1. Using the Phillips screwdriver, remove the six screws from the top cover of the grinder. Notice that the back side screws are shorter than the other four screws (purple arrows).
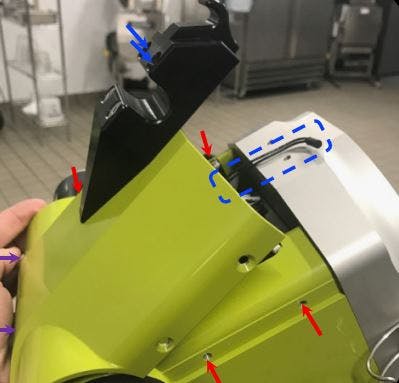
2. Using the Phillips screwdriver, remove the two screws (blue arrows) in the hopper door hinge which are closest to the grinder disc area, leaving the two that attach to the lid as is.
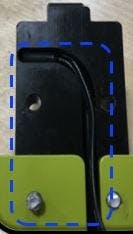
3. Remove the top cover from the machine. When removing, make sure the two black wires and small black magnetic cylinder are free from the hinge block (blue outline).
For additional technical support needs, contact our technical support team. To order new parts and press bags, visit the X-1 Mini parts page.