


Preventative Standard Maintenance for the Goodnature X-1 Cold-Press Juicer
BEFORE YOU START: Disconnect all power before performing maintenance to avoid risk of serious electric shock.
See below for daily, weekly and monthly standard maintenance video, downloadable guide and step by step written instructions.
Refer to the Maintenance Guide that came with your machine. To order a new one, click here: Order washable Maintenance Guide or download it here
Daily:
(See image below / refer to p. 19 in owner’s manual)
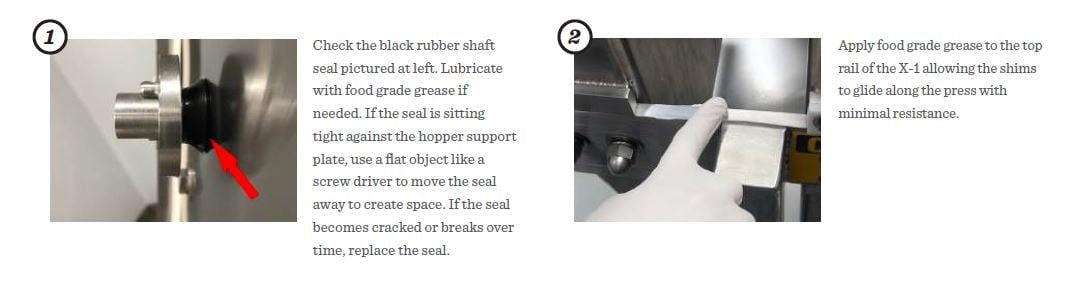
- Check the black rubber shaft seal located on the grinder underneath the backing plate. Lubricate with food grade grease if overly dry and needed. If the seal is sitting tight against the hopper support plate, use a flat object like a screwdriver to move the seal forward slightly to create space. This will keep the seal from rubbing and creating friction when using the grinder. If the seal becomes cracked or breaks over time, replace the seal.
- Apply food grade grease to the top rail of the X-1 allowing the shims to glide along the press with minimal resistance.
ProTip: Cooking oils like olive and coconut oil will build up residue making it tougher to clean over time. We recommend this food grade oil.
Weekly:
(See image below / refer to p. 19 in owner’s manual)
- Make sure the press handle is tight so it functions properly. Using an adjustable wrench, ensure the tightness of the press handle. For machines manufactured prior to July 2015, use a 3/32″ allen wrench to tighten the set screws of the press handle.
- Ensure the drive shaft is in place and give the shaft seal room to operate. Using a 1/8” allen wrench, tighten the set screws on the drive shaft between motor and grinder plate.
- Check the blades weekly to confirm they are still sharp. If they become dull to the touch, they should be replaced. You can order new blades here. Also see recommended replacement time frames in last section of this article.

Monthly:
(See image below / refer to p. 20 in owner’s manual)
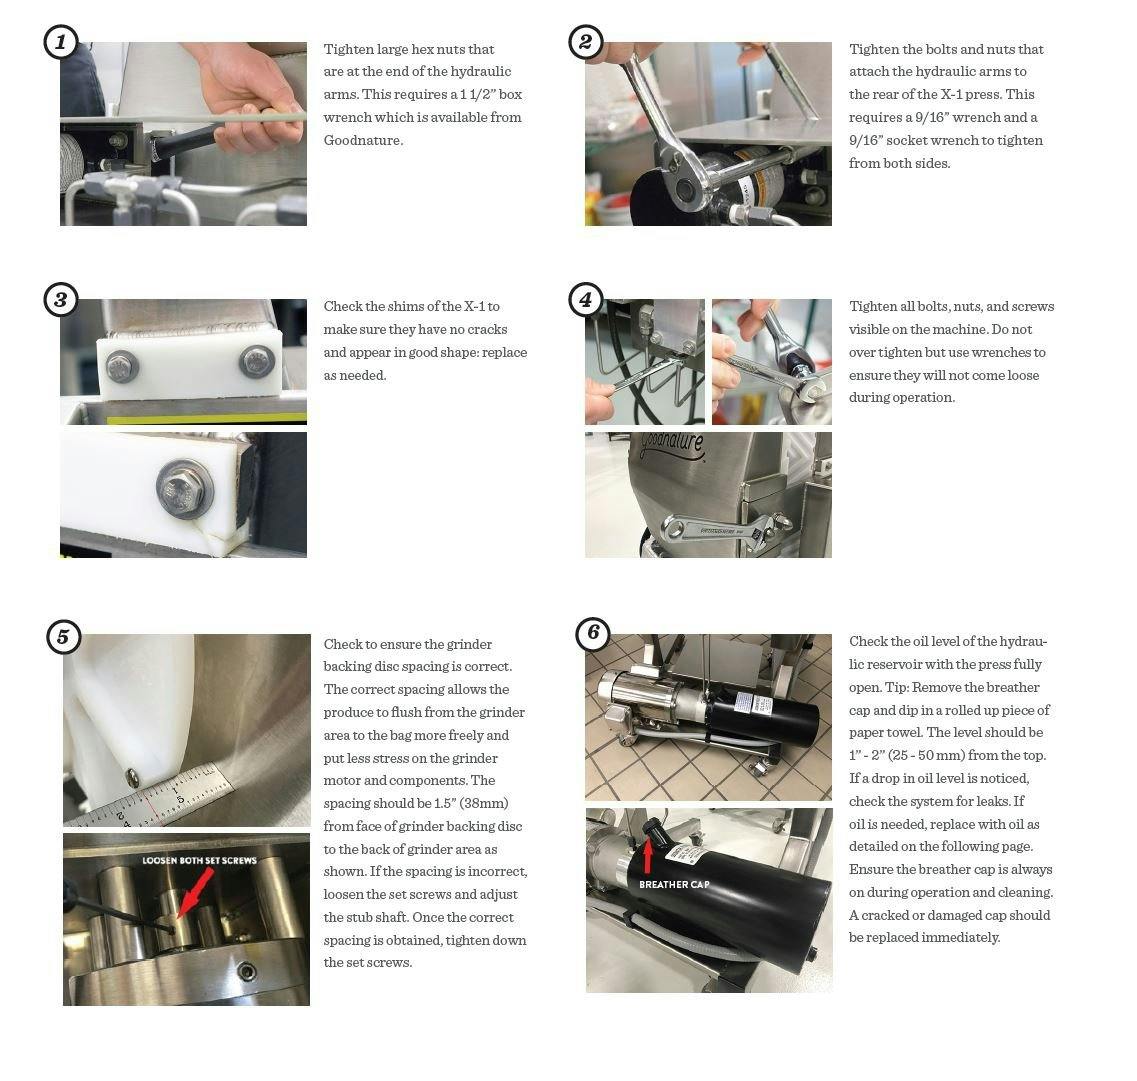
- Tighten large hex nuts that are at the end of the hydraulic arms. This requires a 1- 1/2” box wrench which is supplied in the tool kit and also available in our shop. The X-1 Toolkit comes will all the tools needed to perform maintenance on the machine.
- Tighten the bolts and nuts that attach the hydraulic arms to the rear of the X-1 press. This requires a 9/16” wrench and a 9/16” socket wrench to tighten from both sides.
- Check the shims of the X-1 to make sure they have no cracks and appear in good shape; replace as needed.
- Tighten all bolts, nuts, and screws visible on the machine. Do not over tighten but use wrenches to ensure they will not come loose during operation.
- Check to ensure the grinder backing disc spacing is correct. The correct spacing allows the produce to flush from the grinder area to the bag more freely and puts less stress on the grinder motor and components. The spacing should be 1.5″ (38mm) from face of grinder backing disc to the back of grinder area as shown. If the spacing is incorrect, loosen the set screws and adjust the stub shaft. Once the correct spacing is obtained, tighten down the set screws.
- Check the oil level of the hydraulic reservoir with the press fully open. Tip: Remove the breather cap and dip in a rolled up piece of paper towel. The level should be 1″-2″ (25mm-50mm) from the top. If a drop in oil level is noticed, check the system for leaks. If oil is needed, replace with oil as detailed in the manual. Ensure the breather cap is always on during operation and cleaning. A cracked or damaged cap should be replaced immediately.
Order the large washable version to hang in your kitchen for easy reference and reminder.
For more detailed information on cleaning your X-1, refer to the X-1 Owner's Manual. For product and ordering information, visit the X-1 product page. To order new parts and press bags, visit the X-1 parts page.